---
layout: blog
title: Cloud Services
linkTitle: Cloud Services
categories: Uncategorized
tags: [Uncategorized, Cloud Services]
date: 2024-06-28 15:32:02 +0800
draft: true
toc: true
toc_hide: false
math: false
comments: false
giscus_comments: true
hide_summary: false
hide_feedback: false
description:
weight: 100
---
This is the multi-page printable view of this section. Click here to print.
- Certificate Application Issues Caused by CNAME–TXT Conflicts
- Releasing Reserved Memory on a VPS
- Alibaba Cloud Series
- ingress-nginx is not the same as nginx ingress
- Using Alibaba Cloud Distributed Storage with Self-Built K8s Clusters
- Volume Classification and Methodology
Certificate Application Issues Caused by CNAME–TXT Conflicts
CNAME and TXT Records With the Same Prefix Cannot Coexist
Anyone who has ever configured a domain knows that (A, AAAA) records cannot coexist with a CNAME, but most people have never run into a TXT vs. CNAME conflict.
When would TXT and CNAME need the same prefix?
One scenario occurs while applying for a Let’s Encrypt certificate and using the DNS-01 challenge to prove domain ownership.
- Certbot creates a TXT record for
_acme-challenge.example.com, using an akid/aksecret pair or a token. - Let’s Encrypt queries the TXT record to confirm that the applicant can modify DNS and therefore controls the domain.
- Let’s Encrypt issues the certificate.
- Certbot cleans up the TXT record for
_acme-challenge.example.com.
If a CNAME record for _acme-challenge.example.com already exists when the TXT record is created, the TXT record insertion usually fails, causing the challenge to fail and the certificate to be denied.
Why does a CNAME record like _acme-challenge.example.com ever exist?
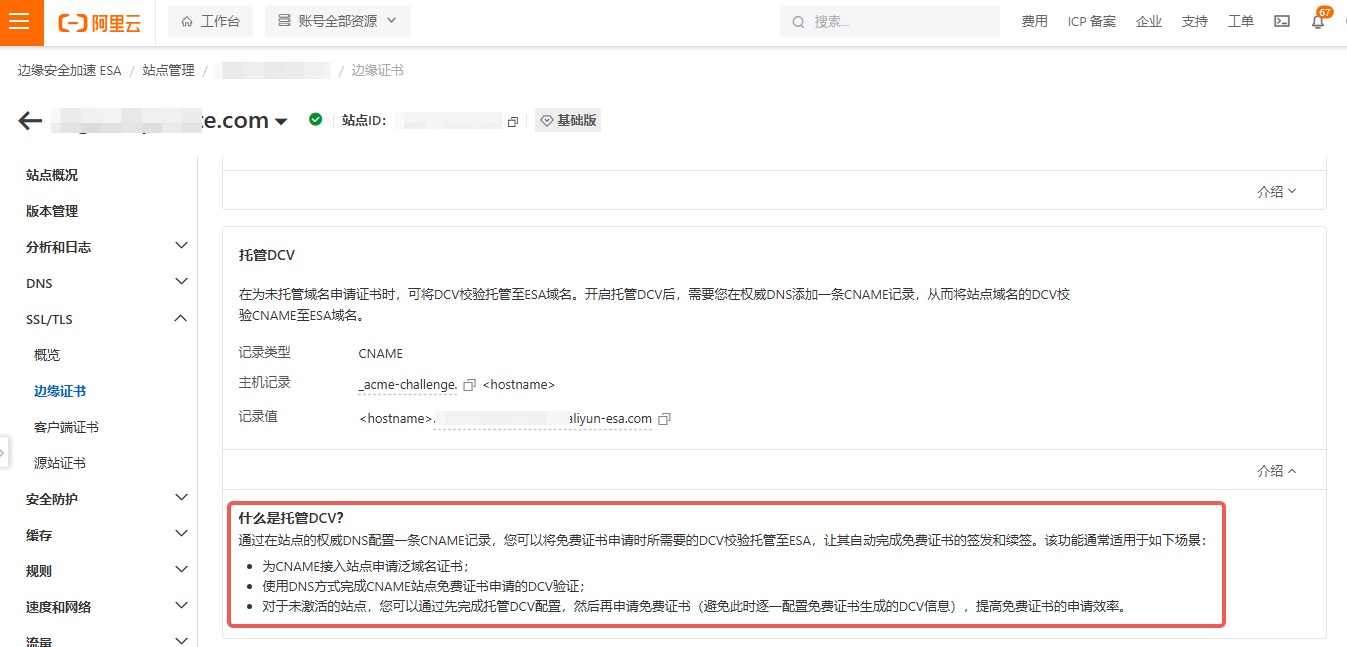
Alibaba Cloud recently launched ESA (Edge Security Acceleration), a service similar to Cloudflare and the successor/extension of the original DCDN - Full Site Acceleration.
At first it did not support self-service wildcard certificates, so I ran a periodic script that pushed my own wildcard cert via the ESA API, which was a bit of a hassle.
Later, Managed DCV was introduced, allowing wildcard certs to be requested and renewed automatically.
Following the official docs worked great—suddenly wildcard certs “just worked.”
But the hidden trap only surfaced months later: the persistent CNAME record blocks creation of any TXT record with the same prefix, so I can no longer validate domain ownership elsewhere.
Solutions
Option 1: Stop Using Managed DCV
Managed DCV requires you to point _acme-challenge.example.com to a specific value, which essentially delegates that label (and therefore validates your domain) to a third party—you no longer control it.
If you still need a wildcard certificate, you can task a script to call ESA’s API and upload a new wildcard cert at regular intervals.
Option 2: Switch to a Different Challenge Type
Certbot offers several ways to prove domain ownership:
| Method | Description |
|---|---|
| DNS-01 | Create a TXT record; no prior web server required. |
| HTTP-01 | Place a file on the active web server. |
| TLS-ALPN-01 | Present a special TLS certificate from the server. |
HTTP-01 and TLS-ALPN-01 require a running service before you can get a certificate, whereas DNS-01 works before any services are online.
Option 3: Break Down the Silo Between ESA and Alibaba Cloud DNS
Both products belong to Alibaba Cloud, but they implement separate DNS APIs.
If ESA could create a TXT or CNAME record in Alibaba Cloud DNS, obtain a certificate, and then immediately delete the temporary record, DNS-01 challenges elsewhere would remain unaffected.
Option 4: Leave Alibaba Cloud ESA
Cloudflare doesn’t have this problem—certificates are issued freely without hostname delegation.
Releasing Reserved Memory on a VPS
By default, the Linux kernel reserves a block of memory for kdump, and its size is controlled by the crashkernel parameter. Most application developers rarely trigger kernel panics, so you can recover this memory by editing /etc/default/grub.
If you do not need kdump, set the crashkernel parameter to
0M-1G:0M,1G-4G:0M,4G-128G:0M,128G-:512M; this releases the reserved memory.
Check current value: cat /etc/default/grub
Typical default:
GRUB_CMDLINE_LINUX=" vga=792 console=tty0 console=ttyS0,115200n8 net.ifnames=0 noibrs nvme_core.io_timeout=4294967295 nvme_core.admin_timeout=4294967295 iommu=pt crashkernel=0M-1G:0M,1G-4G:192M,4G-128G:384M,128G-:512M crash_kexec_post_notifiers=1"
crashkernel above means
• 0–1 GB hosts: 0 MB reserved
• 1–4 GB hosts: 192 MB reserved
• 4–128 GB hosts: 384 MB reserved
• ≥128 GB hosts: 512 MB reserved
For example, a 1 GB host falls into the 1–4 GB bracket, so 192 MB is reserved; a 4 GB host falls into the 4–128 GB bracket, reserving 384 MB.
Apply change:
sudo sed -i 's/crashkernel=0M-1G:0M,1G-4G:192M,4G-128G:384M,128G-:512M/crashkernel=0M-1G:0M,1G-4G:0M,4G-128G:0M,128G-:512M/' /etc/default/grub
sudo update-grub && sudo reboot
For a typical beginner VPS (2 vCPU + 1 GB RAM):
# Before
root@iZj6c0otki9ho421eewyczZ:~# free
               total        used        free      shared  buff/cache   available
Mem:          707180      340772      123400        2624      358872      366408
Swap:              0           0           0

# After
root@iZj6c0otki9ho421eewyczZ:~# free
               total        used        free      shared  buff/cache   available
Mem:          903788      341656      451380        2616      251032      562132
Swap:              0           0           0
For a 2 vCPU + 4 GB VPS:
# Before
root@iZj6c1prxn78ilvd2inku1Z:~# free
               total        used        free      shared  buff/cache   available
Mem:         3512696      377672     2870944        1260      415116     3135024
Swap:              0           0           0

# After
root@iZj6c1prxn78ilvd2inku1Z:~# free
               total        used        free      shared  buff/cache   available
Mem:         3905912      374468     3408304        1252      270508     3531444
Swap:              0           0           0
More about kdump
Kdump is a Linux kernel crash-dumping mechanism. It relies on the kexec facility, which allows one kernel to load another kernel without BIOS initialization. When a fatal error triggers a panic, the running “production” kernel uses kexec to boot a small “capture” kernel that has exclusive use of the reserved memory. The capture kernel then writes the entire memory image (vmcore or kdump file) to disk, a network server, or another storage target. Later, the vmcore can be analyzed to determine the crash cause.
Alibaba Cloud Series
- _index
How to obtain a wildcard certificate in CNAME mode with ESA
Your domain is hosted on Alibaba Cloud DNS or a third-party provider, and you cannot move the domain’s NS, yet you need a wildcard certificate. Alibaba Cloud ESA provides a quota of 10 certificates, which is clearly insufficient.
Here is a method to obtain a wildcard certificate, followed by an explanation of the principle.
You’ll need to work in two separate consoles:
- ESA
- DNS (Cloud Resolution or third-party DNS)
Steps
- ESA: DNS → Settings: Switch to NS mode, confirm directly—no additional action needed.
- ESA: apply for a free edge certificate, request only
*.example.com, using your own domain. - ESA: expand the dropdown next to the pending certificate to obtain the TXT record: host record
_acme-challenge.example.com, value-PewtWrH93avbM_bScUILtcNwCHifNvjZIa2VgT9seQ. - DNS: add a TXT record with the host record and value from the previous step.
- Wait for the wildcard certificate to be issued; if it hasn’t been obtained within ten minutes, something went wrong—check manually.
- ESA: DNS → Settings: Switch back to CNAME mode, confirm directly—no additional action needed.
Principle
Free certificates come from Let’s Encrypt, which offers two validation methods:
- HTTP-01 Challenge: Let’s Encrypt’s validation server makes an HTTP request to a specific file on your server (at the path
.well-known/acme-challenge/) to confirm domain control. - DNS-01 Challenge: you must add a TXT record to your domain’s DNS. By adding the required TXT record you prove control of the domain.
Wildcard certificates can only be obtained via DNS-01 Challenge; hence they require DNS records. Consequently, ESA insists that domains must be hosted on the ESA platform in order to apply for wildcard certificates. The step “ESA: DNS → Settings: Switch to NS mode” is derived from analysing the return of ESA’s ApplyCertificate interface; this step has no practical effect other than bypassing Alibaba Cloud’s validation.
The core procedure is to place a pre-defined TXT record on the domain’s authoritative nameservers when requesting a certificate from Let’s Encrypt. Whether those nameservers belong to DNS (Cloud Resolution) or ESA is irrelevant—the TXT record suffices to prove domain ownership.
Summary
ESA and Cloud Resolution are both under the Alibaba Cloud umbrella, yet they cannot share data. ESA already has the ability to verify domain ownership for your account; obtaining a wildcard certificate could be as simple as adding a DNS record via Cloud Resolution and granting permission, but this is not implemented. There is still room for better UX.
Be aware that certificates acquired this way may fail to auto-renew. You can use the API to synchronise a certificate into ESA externally: https://api.aliyun.com/api/ESA/2024-09-10/SetCertificate
ingress-nginx is not the same as nginx ingress
After two weeks of reading documents, I finally realized that Ingress-Nginx and Nginx Ingress are not the same thing; they differ in functionality as well as implementation. There are even documents guiding the migration.
- Migrating from the Ingress-NGINX Controller to the NGINX Ingress Controller
- NGINX Ingress Controller
- Ingress-NGINX
Ingress-NGINX is the community edition with more participants and a greater number of search results. NGINX Ingress is the commercial edition, richer in features but with lower community participation.
According to Deploy with NGINX Ingress Controller - Overview
NGINX Ingress Controller can be used for free with NGINX Open Source. Paying customers have access to NGINX Ingress Controller with NGINX Plus. To deploy NGINX Ingress Controller with NGINX Service Mesh, you must use either:
Open Source NGINX Ingress Controller version 3.0+ NGINX Plus version of NGINX Ingress Controller Visit the NGINX Ingress Controller product page for more information.
You can use NGINX Ingress Controller for free via NGINX Open Source, while paying customers can access it through NGINX Plus.
Additionally, the Nginx commercial edition’s official website has moved to www.f5.com
The Nginx Ingress Controller product page is https://www.f5.com/products/nginx/nginx-ingress-controller
This May 2021 blog post compared their differences: There are two Nginx Ingress Controllers for k8s. What?
| Aspect or Feature | kubernetes/ingress-nginx | nginxinc/kubernetes-ingress with NGINX | nginxinc/kubernetes-ingress with NGINX Plus |
|---|---|---|---|
| Fundamental | |||
| Authors | Kubernetes community | NGINX Inc and community | NGINX Inc and community |
| NGINX version | Custom NGINX build that includes several third-party modules | NGINX official mainline build | NGINX Plus |
| Commercial support | N/A | N/A | Included |
| Implemented in | Go/Lua (while Nginx is written in C) | Go/Python | Go/Python |
| Load balancing configuration via the Ingress resource | |||
| Merging Ingress rules with the same host | Supported | Supported via Mergeable Ingresses | Supported via Mergeable Ingresses |
| HTTP load balancing extensions - Annotations | See the supported annotations | See the supported annotations | See the supported annotations |
| HTTP load balancing extensions – ConfigMap | See the supported ConfigMap keys | See the supported ConfigMap keys | See the supported ConfigMap keys |
| TCP/UDP | Supported via a ConfigMap | Supported via custom resources | Supported via custom resources |
| Websocket | Supported | Supported via an annotation | Supported via an annotation |
| TCP SSL Passthrough | Supported via a ConfigMap | Supported via custom resources | Supported via custom resources |
| JWT validation | Not supported | Not supported | Supported |
| Session persistence | Supported via a third-party module | Not supported | Supported |
| Canary testing (by header, cookie, weight) | Supported via annotations | Supported via custom resources | Supported via custom resources |
| Configuration templates | See the template | See the templates | See the templates |
| Load balancing configuration via Custom Resources | |||
| HTTP load balancing | Not supported | See VirtualServer and VirtualServerRoute resources | See VirtualServer and VirtualServerRoute resources |
| TCP/UDP load balancing | Not supported | See TransportServer resource | See TransportServer resource |
| TCP SSL Passthrough load balancing | Not supported | See TransportServer resource | See TransportServer resource |
| Deployment | |||
| Command-line arguments | See the arguments | See the arguments | See the arguments |
| TLS certificate and key for the default server | Required as a command-line argument/ auto-generated | Required as a command-line argument | Required as a command-line argument |
| Helm chart | Supported | Supported | Supported |
| Operator | Not supported | Supported | Supported |
| Operational | |||
| Reporting the IP address(es) of the Ingress controller into Ingress resources | Supported | Supported | Supported |
| Extended Status | Supported via a third-party module | Not supported | Supported |
| Prometheus Integration | Supported | Supported | Supported |
| Dynamic reconfiguration of endpoints (no configuration reloading) | Supported with a third-party Lua module | Not supported | Supported |
Using Alibaba Cloud Distributed Storage with Self-Built K8s Clusters
Introduction
This article, written on 2024-06-14, explains how to use Alibaba Cloud distributed storage in a self-built cluster on Alibaba Cloud. At the end you will find document links; the official Alibaba Cloud documentation is in Chinese, while the Alibaba Cloud storage plugin repository on GitHub currently contains only English docs—readers who can do so are encouraged to consult the original texts.
Storage Plugin Installation
- Create a custom permission policy: https://github.com/kubernetes-sigs/alibaba-cloud-csi-driver/blob/master/docs/ram-policies/disk.json
- Create a RAM role, attach the custom policy, and save the
accesskeyandsecret:kubectl create secret -n kube-system generic csi-access-key --from-literal=id='{id}' --from-literal=secret='{secret}'
- Install the CSI driver—no Helm chart exists, so installation must be done locally (as of 2024-06-13).
git clone https://github.com/kubernetes-sigs/alibaba-cloud-csi-driver.gitcd alibaba-cloud-csi-driver/deploy- If you are deploying to a self-built cluster on Alibaba Cloud ECS, simply run the next command; otherwise, read the notes carefully: https://github.com/kubernetes-sigs/alibaba-cloud-csi-driver/blob/master/docs/install.md
helm upgrade --install alibaba-cloud-csi-driver ./chart --values chart/values-ecs.yaml --namespace kube-system
- Confirm with
watch kubectl get pods -n kube-system -l app=csi-plugin
Storage Type Selection Guide
- The minimum size for an ECS cloud disk is 20 GB with 3,000 IOPS; this is quite large and not particularly cost-effective.
- Dynamic cloud-disk volumes
- Official docs:
- Cloud disks cannot span availability zones; they are non-shared and can be mounted by only one Pod at a time (tests show multiple Pods in the same deployment can mount the same disk).
- Disk type must match the ECS type or mounting will fail. Refer to Instance Families for detailed compatibility.
- During deployment, a StorageClass auto-provisions the PV to purchase the cloud disk. If you have already purchased the disk, use a static volume instead.
- The requested disk size must lie within the range allowed for single disks.
- When the Pod is recreated, it will re-attach the original cloud disk. If scheduling constraints prevent relocation to the original AZ, the Pod will stay in the Pending state.
- Dynamically created disks are pay-as-you-go.
- Extra test notes:
- Although multiple Pods can mount a disk, only one can read and write; the rest are read-only. Therefore the PVC must set
accessModestoReadWriteOnce, and changing this has no effect. - If the StorageClass
reclaimPolicyisDelete, deleting the PVC also automatically deletes the cloud disk. - If the StorageClass
reclaimPolicyisRetain, the cloud disk is not deleted automatically; you must manually remove it both from the cluster and from the Alibaba Cloud console.
- Although multiple Pods can mount a disk, only one can read and write; the rest are read-only. Therefore the PVC must set
- A suitable scenario is hard to find.
- Official docs:
- Static cloud-disk volumes
- Official docs:
- Manually create the PV and PVC.
- Cloud disks cannot span availability zones; they are non-shared and can be mounted by only one Pod at a time.
- Disk type must match the ECS type or mounting fails.
- You may select disks in the same region and AZ as the cluster that are in the “Available” state.
- Official docs:
- Dynamic cloud-disk volumes
- NAS exhibits comparatively high latency; the best-case latency is ~2 ms, deep storage ~10 ms, pay-as-you-go, and offers better read/write performance than OSS object storage.
- OSS volume: https://help.aliyun.com/zh/ack/ack-managed-and-ack-dedicated/user-guide/oss-volume-overview-1?spm=a2c4g.11186623.0.0.43166a351NbtvU
- OSS is shared storage that can serve multiple Pods simultaneously.
- As of 2024-06-13 supports CentOS, Alibaba Cloud Linux, ContainerOS and Anolis OS.
- Each application uses an independent PV name when using the volume.
- OSS volumes rely on ossfs as a FUSE file system.
- Good for read-only workloads—e.g., reading config, videos, images, etc.
- Not suitable for writing; consider the OSS SDK for writes or switch to NAS.
- ossfs can be tuned (cache, permissions, etc.) via configuration parameters.
- ossfs limitations:
- Random or append writes cause the entire file to be rewritten.
- Listing directories and other metadata operations are slow due to remote calls.
- File/folder rename is not atomic.
- When multiple clients mount the same bucket, users must coordinate behavior (e.g., avoid concurrent writes to the same file).
- No hard links.
- For CSI plugin versions below v1.20.7, only local changes are detected; external modifications by other clients or tools are ignored.
- Do not use in high-concurrent read/write scenarios to avoid system overload.
- In a hybrid cluster (with some nodes outside Alibaba Cloud) only NAS and OSS static volumes can be used.
- Cloud disks, NAS, and OSS have region restrictions.
In summary: Cloud disks are provisioned and mounted as whole disks, making sharing inconvenient. OSS operates at file granularity; high-concurrent read/write suffers performance issues and supported OSes are limited.
- Cloud disks suit databases or other scenarios demanding large space and high performance.
- For scenarios with lower performance needs, NAS is a good choice.
- OSS is unsuitable for high-concurrent writes on Alibaba Cloud clusters, though it may suit concurrent-read workloads.
The official documentation contains inconsistencies and contradictions; readers should check the date and run their own tests to verify whether a formerly unsupported feature may have since become supported.
Operation Steps
Follow the official Alibaba Cloud guide. After installing the storage plugin as described above, you can proceed with deployment using Use NAS static volumes.
Note: k3s users may hit issues with local-path-storage, seeing errors like:
- failed to provision volume with StorageClass “local-path”: claim.Spec.Selector is not supported
- Waiting for a volume to be created either by the external provisioner ’localplugin.csi.alibabacloud.com’ or manually by the system administrator. If volume creation is delayed, please verify that the provisioner is running and correctly registered.
To avoid k3s’s default local-path-storage, set storageClassName in the persistentVolumeClaim to empty:
kind: PersistentVolumeClaim
apiVersion: v1
metadata:
  name: pvc-nas
spec:
  accessModes:
    - ReadWriteMany
  resources:
    requests:
      storage: 2Gi
  selector:
    matchLabels:
      alicloud-pvname: pv-nas
  storageClassName: ""
References
- https://github.com/kubernetes-sigs/alibaba-cloud-csi-driver
- https://github.com/kubernetes-sigs/alibaba-cloud-csi-driver/blob/master/docs/disk.md
- https://github.com/kubernetes-sigs/alibaba-cloud-csi-driver/blob/master/docs/install.md
- https://github.com/kubernetes-sigs/alibaba-cloud-csi-driver/blob/master/docs/ram-policies/disk.json
- https://github.com/kubernetes-sigs/alibaba-cloud-csi-driver/blob/master/deploy/chart/values.yaml
- https://help.aliyun.com/zh/ack/ack-managed-and-ack-dedicated/user-guide/use-dynamically-provisioned-disk-volumes?#6d16e8a415nie
- https://help.aliyun.com/zh/ack/ack-managed-and-ack-dedicated/user-guide/mount-statically-provisioned-nas-volumes?spm=a2c4g.11186623.0.0.125672b9VnrKw6
Volume Classification and Methodology
---
layout: blog
title: Image Hosting Design and Selection
linkTitle: Image Hosting Design and Selection
categories: uncategorized
tags: [uncategorized, cloud-services]
date: 2024-06-28 15:46:17 +0800
draft: true
toc: true
toc_hide: false
math: false
comments: false
giscus_comments: true
hide_summary: false
hide_feedback: false
description:
weight: 100
---
- Image Hosting Design and Selection
What Is Image Hosting?
In short, image hosting is a remote server used to store and manage the image assets required by a blog or website.
Why Use Image Hosting?
Image hosting can significantly improve website load speeds, decouple content from images, and reduce server pressure. From an article-organization and blog-architecture perspective, image hosting provides better image management and enhances the overall user experience.
What is the essential difference between using and not using image hosting—is it merely speed?
If a rented server has sufficient bandwidth, can one skip image hosting?
Actually, the bigger impact lies in the differing coupling strength between Markdown files and images. In other words, the way content is organized and the overall blog architecture differ.
Without image hosting, images and Markdown files are tightly coupled; image management and usage rely on relative paths.
With image hosting, image management occurs on a remote server, while local files only reference remote URLs—an absolute-path approach.
Absolute paths are usually preferable, since they ensure consistent image availability. With relative paths, references break if either the Markdown file or the image path changes.
Blogs that use relative paths are harder to refactor, maintain, and share across platforms. The many articles online with broken images often suffer from poorly managed file–resource relationships.
How Image Hosting Speeds Up Your Site
Typical personal servers have tight bandwidth limits. My long-standing VPS, for example, tops out at 5 Mbps, allowing only 600 KB/s.
With two 3 MB images in a post, page load time exceeds 10 seconds.
We must recognize that few people will wait 10 seconds for a page.
How to solve slow loads?
One can use lazy-load, showing text first and images later, so visitors aren’t stuck with a blank page.
This is only a stop-gap; many users leave even short pages within 10 seconds, and bandwidth spent on loading unseen images isn’t delivering useful content.
The straightforward fix is increasing bandwidth, but dedicated bandwidth is expensive. Alibaba Cloud’s 1000 Mbps daily rental exceeds 6,000 CNY, making monthly costs surpass 180,000 CNY—unaffordable for individuals.
Providers offer traffic-based billing in addition to fixed bandwidth. Mainsland cloud vendors price this at 0.5 CNY/GB to 1 CNY/GB, with 10 Mbps and 1 Tbps behaving identically cost-wise; you can burst to full bandwidth.
Note that traffic billing is post-paid. If the site is attacked, mass resource fetching can bankrupt you. Attack methods are so trivial that prevention is nearly impossible.
My home broadband offers 1 TB/month for under 200 CNY—easily used to exhaust a server’s traffic quota at near-zero attacker cost.
One can build a self-hosted image server—configure nginx, restrict per-IP rate limits, limit multimedia access contexts, pre-compress and resize images—but these steps consume valuable time.
Third-party image-hosting services specialize in image storage and usually bundle CDN (Content Delivery Network), accelerating transfers, cutting load times, and reducing server load.
Therefore, I strongly recommend third-party image hosting. They often add extras: compression, cropping, watermarks, etc., easing management and presentation.
How to Choose an Image Host
Hosts break into third-party and self-hosted. Third-party types:
- Simple dedicated hosts—upload, get URL (sm.ms, imgur).
- Complex general storage (e.g., Alibaba Cloud OSS, Tencent Cloud COS) store any file type and provide extras: compression, crops, watermarks, image audits, recognition, etc.
Evaluate these dimensions: visit experience, authoring experience, adaptability, attack resilience. Based on them, choose your host.
Authoring Experience
Some hosts require uploading via browser, the worst experience. Lacking an API means breaking flow with: open page → upload → copy URL.
Hence prefer an API-enabled host. You can then bind a shortcut (e.g., in PicGo) and upload without interrupting your writing.
I recommend the open-source client PicGo—multi-host support, custom APIs. In self-hosted scenarios, FTP/WebDAV upload is also convenient.
Visit Experience
For best performance, add CDN. Building your own CDN is hard and costly, and—due to policy—some providers’ CDNs may underperform inside China; test personally.
Cost
The three cost areas:
- Storage
- Server traffic / bandwidth
- CDN traffic
Once live with noticeable traffic, CDN traffic dominates expenses, so focus on its unit price.
Alibaba Cloud starts at 0.24 CNY/GB; large-scale discounts exist, but most individuals/businesses never hit them.
Avoid Bankruptcy
This section is security-critical enough to warrant this title.
Primary attack form: amplify traffic via DDoS. Instead of crashing servers, CDNs absorb attacks, burning fees. Forum posters lost 60 TB in a week. A public service will be attacked.
Most providers bill post-paid: use more, pay more. Monitor this risk closely.
Mitigation options:
-
Cloudflare handles attacks automatically.
-
Others supply security knobs (disabled by default):
-
Restrict referrer, allowing requests only from specified sites (or block no-referrer).
-
Restrict user-agent, e.g., reject curl.
See Alibaba OSS settings below:

These merely prevent hot-linking; attackers still craft valid requests.
OSS Advanced Mitigation promises real protection, but Alibaba’s price is outrageous—it should be built-in, not sold as an extra.
Anti-DDoS pricing is so extreme that either Alibaba lacks ability or the product team lacks sense.
I do not recommend Alibaba OSS for image hosting—it offers no real protection (“only stops the honest”).
Conclusion
As blogs evolve, you will eventually face the concept of image hosting. Start early to decouple content and images—the benefits are clear.
When selecting an image host, consider:
- Upload API
- CDN with appropriate performance
- DDoS protection
On these grounds I mainly recommend sm.ms. The free tier suffices for most users, albeit at modest speed.
References
---
layout: blog
title: How to preserve the original client IP after load-balancing in a K8s cluster
categories: Networking
tags: [networking, blog]
date: 2024-05-27 11:52:22 +0800
draft: false
toc: false
comments: false
---

## Introduction

**Application deployment** is not always as simple as **installation** and **run**—sometimes you also have to consider **networking** issues. This post introduces how to let a service running in a **Kubernetes cluster** retrieve a request’s **source (client) IP**.

A service generally relies on some input information. If that input does not depend on the **5-tuple** (source IP, source port, destination IP, destination port, protocol), then the service has **low coupling with the network** and does not need to care about networking details.

Therefore, most people don’t need to read this article. If you are interested in networking or want to broaden your horizons, please keep reading and learn about more service scenarios.

This article is based on Kubernetes `v1.29.4`. Some statements mix “Pod” and “Endpoint”; in the scenario described here they can be treated as equivalent.

**If you spot any mistakes, let me know and I will promptly correct them.**

## Why is source-IP information lost?

Let’s first clarify what source IP means. When A sends a request to B and B forwards that request to C, even though C’s IP layer says the source IP is B, **this article considers A’s IP** to be the source IP.

There are two main reasons the original source information is lost:

1. **Network Address Translation (NAT)**, whose goals are to conserve public IPv4 addresses and implement load balancing, etc. It will cause the server to see the **NAT device’s IP** instead of the true source IP.
1. **Proxy**, including **Reverse Proxy (RP)** and **Load Balancer (LB)**; the article below refers to them collectively as **proxy servers**. Such proxies forward requests to back-end services but replace the source IP with their own.

- NAT in short **trades port space for IP address space**; IPv4 addresses are limited. One IP address can map to 65,535 ports, and most of the time those ports are not exhausted, so multiple private subnet IPs can share a single public IP, distinguished on ports. The mapping form is: `public IP:public port → private IP_1:private port`—consult [Network Address Translation](https://www.google.com/search?q=network+address+translation) for more.
- A proxy is intended to **hide or expose**. It forwards a request to a back-end service and simultaneously replaces the source IP with its own, thereby concealing the back-end service’s real IP and protecting the back-end service’s security. The proxy usage pattern is: `client IP → proxy IP → server IP`—consult [proxy](https://www.google.com/search?q=proxy) for more.

**NAT** and **proxy servers** are both very common, so most services never obtain the request’s source IP.

_These are the two most common ways the source IP is altered; feel free to add others._

## How to preserve the source IP?

Below is an example `HTTP request`:

| Field             | Length (bytes) | Bit offset | Description                                                |
| ----------------- | -------------- | ---------- | ---------------------------------------------------------- |
| **IP Header**     |                |            |                                                            |
| `Source IP`       | 4              | 0–31       | Sender’s IP address                                        |
| Destination IP    | 4              | 32–63      | Receiver’s IP address                                      |
| **TCP Header**    |                |            |                                                            |
| Source Port       | 2              | 0–15       | Sender’s port                                              |
| Destination Port  | 2              | 16–31      | Receiver’s port                                            |
| Sequence Number   | 4              | 32–63      | Identifies the data the sender is sending in the stream    |
| ACK Number        | 4              | 64–95      | If ACK flag set, next expected sequence number             |
| Data Offset       | 4              | 96–103     | Bytes from start of TCP header to start of data            |
| Reserved          | 4              | 104–111    | Unused, always 0                                           |
| Flags             | 2              | 112–127    | Control flags like SYN, ACK, FIN, etc.                     |
| Window Size       | 2              | 128–143    | Amount of data receiver can accept                         |
| Checksum          | 2              | 144–159    | Error-detection code                                       |
| Urgent Pointer    | 2              | 160–175    | Offset of urgent data (if URG flag set)                    |
| Options           | variable       | 176–...    | May contain timestamps, MSS, etc.                          |
| **HTTP Header**   |                |            |                                                            |
| Request Line      | variable       | ...        | Request method, URI, HTTP version                        |
| `Header Fields`   | variable       | ...        | Headers such as Host, User-Agent, etc.                     |
| Blank Line        | 2              | ...        | Separates headers from body                                |
| Body              | variable       | ...        | Optional request/response body                             |

Looking at the HTTP request structure above, we see that **TCP Options**, **Request Line**, **Header Fields**, and **Body** are variable.
- **TCP Options** have limited space and normally are **not** used to carry the source IP.
- **Request Line** has a fixed semantic and cannot be extended.
- **HTTP Body** will be encrypted and therefore cannot be modified mid-path.

Thus **HTTP header fields** are the only extensible place to carry the source IP.

We can add an `X-REAL-IP` header at a proxy to convey the source IP. The **proxy server** is then supposed to forward the request to a back-end service so that the back-end can read the source IP from this header.

Note that the proxy must sit **before** any NAT device so it can obtain the real client IP. We see Alibaba Cloud treats its [Load Balancer](https://slb.console.aliyun.com/overview) as a separate product that sits differently in the network from ordinary application servers.

## K8s hands-on instructions

We deploy the [whoami](https://github.com/traefik/whoami) project to show how.

### Create a Deployment

First create the service:

```yaml
apiVersion: apps/v1
kind: Deployment
metadata:
  name: whoami-deployment
spec:
  replicas: 3
  selector:
    matchLabels:
      app: whoami
  template:
    metadata:
      labels:
        app: whoami
    spec:
      containers:
        - name: whoami
          image: docker.io/traefik/whoami:latest
          ports:
            - containerPort: 8080
This step creates a Deployment containing 3 Pods; each Pod has one container running the whoami service.
Create a Service
We can create a NodePort or LoadBalancer Service to enable external access, or a ClusterIP Service for intra-cluster access plus an Ingress resource to expose it externally.
NodePort can be reached as NodeIP:NodePort or via an Ingress. We use a NodePort for simplicity here.
apiVersion: v1
kind: Service
metadata:
  name: whoami-service
spec:
  type: NodePort
  selector:
    app: whoami
  ports:
    - protocol: TCP
      port: 80
      targetPort: 8080
      nodePort: 30002
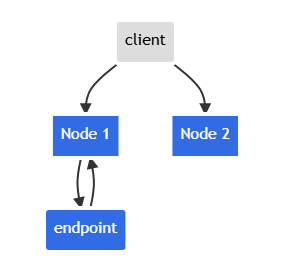
After creation, a curl whoami.example.com:30002 shows the returned IP is the NodeIP, not the client’s source IP.
Note that this is not the true client IP; those are cluster-internal IPs. The flow:
- Client sends packet to
node2:nodePort- node2 performs SNAT, replacing the source IP with its own
- node2 swaps the destination IP to the Pod IP
- packet is routed to node1, then to the endpoint
- Pod reply is routed back to node2
- Pod reply is sent back to the client
Diagram:

Configure externalTrafficPolicy: Local
To avoid the above, Kubernetes has a feature that preserves the client’s source IP.
If you set service.spec.externalTrafficPolicy to Local, kube-proxy only proxies traffic to locally running endpoints and will not forward it to other nodes.
apiVersion: v1
kind: Service
metadata:
  name: whoami-service
spec:
  type: NodePort
  externalTrafficPolicy: Local
  selector:
    app: whoami
  ports:
    - protocol: TCP
      port: 80
      targetPort: 8080
      nodePort: 30002
Now curl whoami.example.com:30002 will show the real client IP as long as the DNS record for whoami.example.com contains only the IPs of nodes that actually host the Pods/Endpoints.
Requests hitting any other node will time out.
This setup has a cost: you lose in-cluster load-balancing capability; requests reach Pods only if the client hits the exact node that runs the Endpoint.
If the client hits Node 2, no response is returned.
Create an Ingress
Most published services use http/https, and https://IP:Port feels odd to users.
We normally put an Ingress in front to front-end the previous NodePort Service onto the standard ports 80/443 of a domain.
apiVersion: networking.k8s.io/v1
kind: Ingress
metadata:
  name: whoami-ingress
  namespace: default
spec:
  ingressClassName: external-lb-default
  rules:
    - host: whoami.example.com
      http:
        paths:
          - path: /
            pathType: Prefix
            backend:
              service:
                name: whoami-service
                port:
                  number: 80
Apply it and test:
root@client:~# curl whoami.example.com
...
RemoteAddr: 10.42.1.10:56482
...

root@worker:~# kubectl get -n ingress-nginx pod -o wide
NAME                                       READY   STATUS    RESTARTS   AGE    IP           NODE          NOMINATED NODE   READINESS GATES
ingress-nginx-controller-c8f499cfc-xdrg7   1/1     Running   0          3d2h   10.42.1.10   k3s-agent-1   <none>           <none>
When we Ingress proxy the NodePort service, we have two layers of Service in front of the Endpoint.
Diagram difference:
graph LR
    A[Client] -->|whoami.example.com:80| B(Ingress)
    B -->|10.43.38.129:32123| C[Service]
    C -->|10.42.1.1:8080| D[Endpoint]
graph LR
    A[Client] -->|whoami.example.com:30001| B(Service)
    B -->|10.42.1.1:8080| C[Endpoint]
In path 1, when outside traffic hits Ingress, the first endpoint that receives it is the Ingress Controller, and only then the eventual whoami endpoint.
The Ingress Controller itself is essentially a LoadBalancer service:
kubectl -n ingress-nginx get svc
NAMESPACE           NAME              TYPE           CLUSTER-IP      EXTERNAL-IP                          PORT(S)                      AGE
ingress-nginx       ingress-nginx     LoadBalancer   10.43.38.129    172.16.0.57,...                     80:32123/TCP,443:31626/TCP   10d
Thus we can apply the same idea, setting externalTrafficPolicy on the Ingress Controller’s Service to preserve the original source IP.
Additionally, we set use-forwarded-headers: true in the ingress-nginx-controller ConfigMap so that the Ingress controller understands the X-Forwarded-For/X-Real-IP headers.
apiVersion: v1
data:
  allow-snippet-annotations: "false"
  compute-full-forwarded-for: "true"
  use-forwarded-headers: "true"
  enable-real-ip: "true"
  forwarded-for-header: "X-Real-IP"  # X-Real-IP or X-Forwarded-For
kind: ConfigMap
metadata:
  labels:
    app.kubernetes.io/component: controller
    app.kubernetes.io/instance: ingress-nginx
    app.kubernetes.io/name: ingress-nginx
    app.kubernetes.io/part-of: ingress-nginx
    app.kubernetes.io/version: 1.10.1
  name: ingress-nginx-controller
  namespace: ingress-nginx
The difference between NodePort and ingress-nginx-controller Services mainly lies in that NodePort back-ends are not scheduled on every node, whereas ingress-nginx-controller back-ends are scheduled on every node that exposes external traffic.
Therefore, unlike NodePort where externalTrafficPolicy: Local causes cross-node requests to fail, Ingress can add headers before proxying, achieving both source IP preservation and load balancing.
Summary
- NAT, Proxy, Reverse Proxy, and Load Balancing can all cause loss of the original client IP.
- To prevent loss, a proxy can place the real IP into the HTTP header field
X-REAL-IPbefore forwarding. In a multi-layer proxy setup you can useX-Forwarded-For; it records the source IP and list of proxy IPs in a stack fashion. - Setting
externalTrafficPolicy: Localon a NodePort Service retains the original client IP, but removes the load-balancing capability across cluster nodes. - Under the premise that ingress-nginx-controller is deployed on every load-balancer-role node via a DaemonSet, setting
externalTrafficPolicy: Localon its Service preserves the original source IP while retaining load balancing.
References
---
layout: blog
title: Detailed Explanation of Qiniu's Free Services
linkTitle: Detailed Explanation of Qiniu's Free Services
categories: Tutorial
tags: [Tutorial, Cloud Services]
date: 2024-06-28 15:33:53 +0800
draft: true
toc: true
toc_hide: false
math: false
comments: false
giscus_comments: true
hide_summary: false
hide_feedback: false
description:
weight: 100
---
- [ ] Detailed Explanation of Qiniu's Free Services
Qiniu provides free object storage services, which are very suitable for image hosting for unknown small blogs. They offer the following free services:
- Storage: 0 - 10 GB free
- Traffic
- CDN back-to-origin traffic: 0 - 10 GB free
- Data retrieval: Free
- Requests
- PUT/DELETE: 0 - 100,000 times free
- GET: 0 - 1,000,000 times free
After the first use, I was charged. Upon checking the detailed bill, I found that the charges were for **outbound internet traffic**.

This is the [detailed billing method](https://www.qiniu.com/prices/kodo) for Qiniu Object Storage.
And detailed explanation: [Metering and Billing Items](https://developer.qiniu.com/kodo/6379/metering-and-billing)
> - Outbound internet traffic: Downstream traffic generated when browsing data over the internet or downloading object storage data to local
> - CDN back-to-origin traffic: Back-to-origin traffic generated when browsing or downloading object storage data through Qiniu Cloud's CDN service
> - Cross-region synchronization traffic: Outbound traffic generated when synchronizing data from the source Bucket to the target Bucket through cross-region synchronization function
To avoid being charged for this part, you should prioritize using the CDN service.
After using CDN, you face a very important question: whether the website uses HTTPS. Currently, HTTPS has become a mandatory requirement for browsers - any website not using HTTPS will be marked as insecure, which greatly affects visitor experience. HTTPS has become the de facto standard, and every website planning for long-term operation should use HTTPS.
Qiniu has a **very malicious** trap here: **Usage generated by HTTPS domains is not included in the free quota**
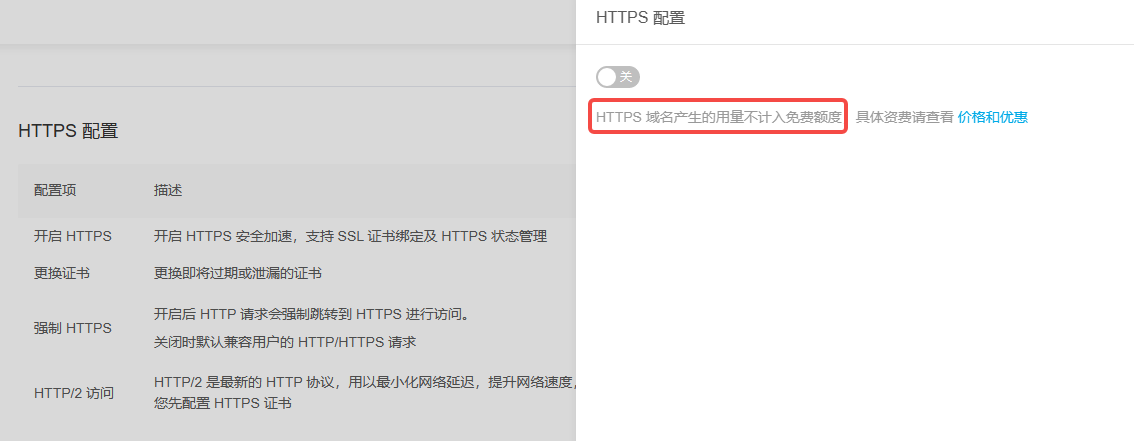
This means that CDN's free traffic is limited to HTTP only, and no free HTTPS traffic is provided.
More detailed documentation is here: [CDN Product Pricing Description](https://developer.qiniu.com/fusion/6843/cdn-product-pricing)
**The documentation is very clear - only HTTP traffic is free for 10GB, HTTPS traffic is not free.**
And `after enabling HTTPS configuration for a domain, all traffic under that domain (including both HTTPS and HTTP requests) will be charged according to HTTPS protocol pricing`, which means if your website supports both HTTP and HTTPS, all traffic will be charged.
So can we embed non-HTTPS links in HTTPS web pages? It's very clear that this is not allowed.
Reference blog post: [Protecting users from insecure downloads in Google Chrome](https://blog.chromium.org/2020/02/protecting-users-from-insecure.html)
When a website uses both HTTPS and HTTP resources, such as introducing HTTP images, CSS, JavaScript files in an HTTPS website, the browser will show a "Mixed Content" error because HTTP resources can be easily exploited by malicious attackers. The solution is to load all resources using HTTPS.
- HTTPS protocol websites do not allow HTTP protocol requests
- HTTP protocol websites allow access to HTTPS protocol resources
The traffic service in Qiniu's free services only includes HTTP CDN back-to-origin traffic. This type of traffic can almost only be used in development and testing environments, or only serves personal HTTP websites.
I have to admire Qiniu's engineers and product managers for their understanding of the business - they were ultimately waiting here. Indeed, there's no such thing as a free lunch.
Through this glimpse of the corporate culture, I recommend abandoning Qiniu's so-called free services and instead using OSS services from other providers.